Thursday, April 28, 2016

Issue Trusted location in Sharepoint 2013

Three  Solution to fix the Excel Client Issue:
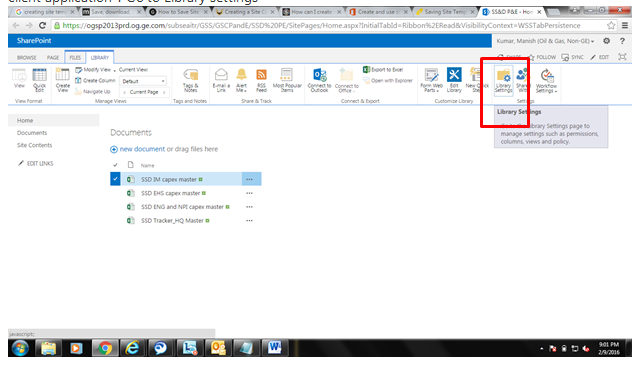
1.       At the Document Library set the "Opening Documents in the Browser" setting to "Open in client application". Go to Library settings


Click on Advance setting


Then select the “Open in the client Application” and OK.

2.        
  • Central Administration --> Manage service applications.
  • Click on Excel services Application.
  • Then click on Trusted file locations
  • You can see that http:// is already there, (you may want to add https:// if the URL is secured) 
  • Also Check the Children Trusted box.


     3. At the site collection level activate the "Open Documents in Client Applications by default Feature"

Update the date column formate in Sharepoint 2013

Q:- Is there a way to display the date including time (like it was in the previous version – see picture)

Ans :- Yes it is there, Please follow the below steps to update the date column format.
1.       Go to the list/library settings page
2.       Click on date and time column from settings page.
3.       Update the display format to “standard”.


Or else you can send me the lists/library links so I will update from my end.

Please let me know if you have any concern.


Thursday, May 21, 2015

Microsoft SharePoint 2013: SSL Certificate Installation Instructions


SharePoint 2013: Installing Your SSL Certificate

SharePoint 2013
Microsoft SharePoint 2013 does not include a GUI for installing the SSL Certificate. Because SharePoint 2013 is designed to run on Microsoft IIS 8, you can use IIS. If you have not yet created a Certificate Signing Request (CSR) and ordered your certificate, see Microsoft SharePoint 2013: SSL Certificate CSR Creation Instructions.
The SharePoint SSL Certificate installation process consists of three steps:
  1. Installing the SSL Certificate
  2. Assigning or binding the certificate to your SharePoint site
    See Using IIS 8 to Assign the Certificate to the SharePoint Website.
  3. Installing the root certificate
    See Using SharePoint 2013 to Install the Root Certificate.

SharePoint 2013: How To Install Your SSL Certificate


Using IIS 8 to Install the SSL Certificate

After DigiCert validates and issues your SSL Certificate, you can use Microsoft IIS 8 to install your SSL Certificate to the server where you generated the CSR, and then, bind it the SharePoint site.
  1. Save the SSL Certificate file (your_domain_name.cer) to the server on which the CSR was generated.
  2. Open Internet Information Services (IIS) Manager.
    From the Start screen, type and click Internet Information Services (IIS) Manager.
  3. In Internet Information Services (IIS) Manager, under Connections, select your server’s Hostname.
    IIS 8 Security Certificates
  4. In the center menu, in the IIS section, double-click the Server Certificates icon.
  5. In the Actions menu, click Complete Certificate Request to open the Complete Request Certificate wizard.
    IIS 8 Complete Request Certificate
  6. On the Specify Certificate Authority Response page, under File name containing the certification authority’s response, click … to browse to the .cer certificate file that DigiCert sent you, select the file, and then, click Open.
    IIS 8 Specify Certificate Authority Response
  7. Next, in the Friendly name box, enter a friendly name for the certificate. The friendly name is not part of the certificate; instead, it is used to identify the certificate.
    We recommend that you add DigiCert and the expiration date to the end of your friendly name, for example: yoursite-DigiCert-expirationDate. This information helps identify the issuer and expiration date for each certificate. It also helps distinguish multiple certificates with the same domain name.
  8. Next, in the Select a certificate store for the new certificate drop-down list, select Personal.
  9. To install the SSL Certificate to the server, click OK.
  10. Once you have successfully installed the SSL Certificate to the server, you still need use IIS to assign or bind that certificate to the SharePoint site.

Using IIS 8 to Assign the Certificate to the SharePoint Website

  1. In Internet Information Services (IIS) Manager, under Connections, expand your server’s name, expand Sites, and then select the SharePointsite.
    iis 8 manager
  2. In the Actions menu, under Edit Site, click Bindings.
  3. In the Site Binding window, click Add.
    IIS 8 Site Bindings window
  4. In the Add Site Bindings window, enter the following information:
    Type:In the drop-down list, select https.
    IP address:In the drop-down list, select All unassigned.
    If your server has multiple IP addresses, select the one that applies.
    Port:Enter 443, unless you are using a non-standard port for SSL traffic.
    SSL certificate:In the drop-down list, select the friendly name of the certificate that you just installed.
    IIS 8 add site binding window
  5. When you are finished, click OK.
    IIS 8 site bindings window
  6. Now you need to install the root certificate on your SharePoint server.

Using SharePoint 2013 to Install the Root Certificate

  1. Log into the DigiCert® Management Console (your account).
  2. In the DigiCert® Management Console, under Order, click the order number for the SSL Certificate that you just installed.
  3. On the My Orders tab, click Download.
    digicert management console
  4. In the Download Certificate section, click the Download or Copy/Paste Individual Certificates link.
    digicert management console
  5. Next, click the ROOT CERTIFICATE icon.
    digicert management console
  6. In the Opening TrustedRoot.crt window, click Save File to save the file to your SharePoint server.
    Opening TrustedRoot.crt window
  7. Next, open SharePoint 2013 Central Administration.
    From the Start screen, type and click SharePoint 2013 Central Administration.
  8. In SharePoint 2013 Central Administration, in the menu on the left, click Security and then, under General Security, click Manage trust.
    sharepoint 2013 central administration
  9. On the Trust Relationships page, in the menu at the top of the page, click New.
  10. In the Establish Trust Relationship window, in the General Setting section, in the Name box, type the name that you want to give the SSL Certificate.
    sharepoint 2013 central administration
  11. In the Root Certificate for the trust relationship section, click Browse to browse for and select the root certificate (i.e. TrustedRoot.crt).
  12. In the Establish Trust Relationship window, click OK.
  13. If the certificate is installed successfully, it should be listed on the Trust Relationships page.
    sharepoint 2013 central administration

Test Your Installation

If your web site is publicly accessible, our DigiCert® SSL Installation Diagnostics Tool can help you diagnose common problems.

Troubleshooting

If you run into certificate errors, try repairing your certificate trust errors using DigiCert® Certificate Utility for Windows. If this does not fix the errors contact support.

Additional Information

IIS 8 and Windows Server 2012 have the Server Name Indication-SNI feature, which you can use to host multiple SSL sites and certificates on a Single IP Address based on Host Headers on your IIS 8 server.

Tuesday, November 26, 2013

Configuring claims and forms based authentication for use with an LDAP provider in SharePoint 2010

Today I worked on configuring forms based authentication for SharePoint 2010. Using forms based authentication automatically means using claims based authentication in Sharepoint 2010.
I tried using both an LDAP provider and a SQL provider. My initial goal was to get them both working in the same environment, but after a lot of hours of staring at XML in web.config files I gave up on that one. Instead I created separate environments for using LDAP and SQL providers. Because of this I will also write two separate blog posts. This one will explain how to set up forms based authentication while using an LDAP provider.
If you want to configure forms based authentication for use with a SQL provider check out my other post here.
Using an LDAP provider with forms based authentication means that users will use their Windows or AD account to log in. However, because forms based authentication will be used they don’t get the usual popup, but they will use a sign-in page to log in.
These are the steps you will need to take to set it up:
Create a new web application
  • Go to Central Administration
  • Go to Application Management
  • Click on Manage Web Applications
  • Click New
  • Select Claims Based Authentication
  • Identity Providers
         * Check the Enable Windows Authentication box or you won’t be able to crawl the site
         * Check the Enable ASP.NET Membership and Role Provider checkbox
              * In the Membership provider name edit box, type LdapMember
              * In the Role provider name edit box, type LdapRole 
 CreateWebAppLdap

 Create a new site collection
  • Go to Central Administration
  • Go to Application Management
  • Click Create site collections
  • Select the newly created web application
  • Fill in a name and select a template 
Adjust the web.config of the Central Administration site
  • Open the Central Administration site's web.config file
  • Find the entry
  • Paste the following XML directly below it
<membership>
   <providers>
      <add name="LdapMember" 
         type="Microsoft.Office.Server.Security.LdapMembershipProvider,
 Microsoft.Office.Server, Version=14.0.0.0, Culture=neutral,
 PublicKeyToken=71e9bce111e9429c" 
         server="dc.sharepoint.com" 
         port="389" 
         useSSL="false" 
         userDNAttribute="distinguishedName" 
         userNameAttribute="sAMAccountName" 
         userContainer="OU=SPUsers,DC=sharepoint,DC=com" 
         userObjectClass="person" 
         userFilter="(ObjectClass=person)" 
         scope="Subtree" 
         otherRequiredUserAttributes="sn,givenname,cn" />
   </providers>
</membership>

<roleManager enabled="true" defaultProvider="AspNetWindowsTokenRoleProvider" > 
   <providers>
      <add name="LdapRole"
         type="Microsoft.Office.Server.Security.LdapRoleProvider, 
Microsoft.Office.Server, Version=14.0.0.0, Culture=neutral, 
PublicKeyToken=71e9bce111e9429c"
         server="dc.sharepoint.com" 
         port="389"
         useSSL="false"
         groupContainer="OU=SPUsers,DC=sharepoint,DC=com"
         groupNameAttribute="cn"
         groupNameAlternateSearchAttribute="samAccountName"
         groupMemberAttribute="member"
         userNameAttribute="sAMAccountName"
         dnAttribute="distinguishedName"
         groupFilter="(ObjectClass=group)"
         userFilter="(ObjectClass=person)"
         scope="Subtree" />
   </providers>
</roleManager>
  • In the above XML the server tag is the server name of the domain controller. The user and group containers are the containers in AD where the users and groups you want to use for authentication reside. If you don’t know what the path to your container is, but you do have access to AD you can find out what the container is.
    • Go to the domain controller
    • Open Active Directory Users and Computers
    • Select a user or a group in the container
    • Right click and select All Tasks => Resultant Set Of Policy (Planning)
    • Click the browse button next to Container and select the container
    • This will give you the path to the container
  • Double check whether the and entries only exist ones. Delete any double entries.
  • Paste the following XML below the entry
<clear />
<add key="AspNetSqlMembershipProvider" value="%" />
<add key="LdapMember" value="*"/>
<add key="LdapRole" value="*"/>

Adjust the web.config of the Security Token Service (STS) virtual directory
NB: you will need to make the changes to the Security Token Service virtual directory on each server hosting either Central Administration or the claims based web application
  • Open the Security Token Service (STS) virtual directory's web.config file
  • Find the
entry
  • Add a entry directly below it
  • Paste the following XML directly below the entry
  • <membership>
       <providers>
          <add name="LdapMember" 
             type="Microsoft.Office.Server.Security.LdapMembershipProvider,
     Microsoft.Office.Server, Version=14.0.0.0, Culture=neutral, 
    PublicKeyToken=71e9bce111e9429c" 
             server="dc.sharepoint.com" 
             port="389" 
             useSSL="false" 
             userDNAttribute="distinguishedName" 
             userNameAttribute="sAMAccountName" 
             userContainer="OU=SPUsers,DC=sharepoint,DC=com" 
             userObjectClass="person" 
             userFilter="(ObjectClass=person)" 
             scope="Subtree" 
             otherRequiredUserAttributes="sn,givenname,cn" />
       </providers>
    </membership>
    
    <roleManager enabled="true"> 
       <providers>
          <add name="LdapRole"
             type="Microsoft.Office.Server.Security.LdapRoleProvider,
     Microsoft.Office.Server, Version=14.0.0.0, Culture=neutral, 
    PublicKeyToken=71e9bce111e9429c"
             server="dc.sharepoint.com" 
             port="389"
             useSSL="false"
             groupContainer="OU=SPUsers,DC=sharepoint,DC=com"
             groupNameAttribute="cn"
             groupNameAlternateSearchAttribute="samAccountName"
             groupMemberAttribute="member"
             userNameAttribute="sAMAccountName"
             dnAttribute="distinguishedName"
             groupFilter="(ObjectClass=group)"
             userFilter="(ObjectClass=person)"
             scope="Subtree" />
       </providers></roleManager>
    • Add a
    entry directly below it

    Adjust the web.config of the claims based web application
    • Open the claims based web application's web.config file
    • Locate the entry
    • Paste the following XML directly below the entry
    <add name="LdapMember" 
       type="Microsoft.Office.Server.Security.LdapMembershipProvider, 
    Microsoft.Office.Server, Version=14.0.0.0, Culture=neutral,
     PublicKeyToken=71e9bce111e9429c" 
       server="dc.sharepoint.com" 
       port="389" 
       useSSL="false" 
       userDNAttribute="distinguishedName" 
       userNameAttribute="sAMAccountName" 
       userContainer="OU=SPUsers,DC=sharepoint,DC=com" 
       userObjectClass="person" 
       userFilter="(ObjectClass=person)" 
       scope="Subtree" 
       otherRequiredUserAttributes="sn,givenname,cn" />
    • Locate the entry
    • Paste the following XML directly below the entry
    <add name="LdapRole"
       type="Microsoft.Office.Server.Security.LdapRoleProvider, 
    Microsoft.Office.Server, Version=14.0.0.0, Culture=neutral, 
    PublicKeyToken=71e9bce111e9429c"
       server="dc.sharepoint.com" 
       port="389"
       useSSL="false"
       groupContainer="OU=SPUsers,DC=sharepoint,DC=com"
       groupNameAttribute="cn"
       groupNameAlternateSearchAttribute="samAccountName"
       groupMemberAttribute="member"
       userNameAttribute="sAMAccountName"
       dnAttribute="distinguishedName"
       groupFilter="(ObjectClass=group)"
       userFilter="(ObjectClass=person)"
       scope="Subtree" />
    • Paste the following XML below the PeoplePickerWildcards entry
    <clear />
    <add key="AspNetSqlMembershipProvider" value="%" />
    <add key="LdapMember" value="*"/>
    <add key="LdapRole" value="*"/>

    Add a user policy to the web application
    • Go to Central Administration
    • Go to Application Management
    • Click on Manage Web Applications
    • Select the claims based web application
    • Click on User Policy
    • Click on the Add Users link
    • Click the Next button.
    • Click the Address Book icon.
    • Type in the NT login name or account name and click the search button. If it’s working correctly you should see at least two entries for the account – one that is for the user’s Active Directory account, and one that is for that same account but which was found using the LDAP provider.
    • Select the account in the User section and click the Add button
    • Click the OK button
    • Check the Full Control checkbox, then click the Finish button
     addPolicyLdap

    You can now browse to the web application and log in using forms based authentication.
    signin
    Select Forms Authentication in the dropdown
     signin3
    And fill in the appropriate user name and password


    Wednesday, October 16, 2013

    Administration SharePoint services

    Administration service is not running:-

    The Microsoft SharePoint Foundation Administration service is required to run on all servers in a Microsoft SharePoint Foundation 2010 farm. This service performs multiple operations on the local server computers that require local administrator permissions for operations; for example, creating and deleting Web applications and service applications, and starting and stopping services. If this service is not running on any server in a SharePoint Foundation 2010 farm, administrative operations can fail or partially succeed.

    Cause: One or more of the following might be the cause:
    ·         The SharePoint Foundation Administration service was stopped by an administrator on a particular computer.
    ·         The user name or password for the account that the SharePoint Foundation Administration service is set to run as is incorrect.
    ·         An error condition in the SharePoint Foundation Administration service caused the service to terminate.

    Resolution:   Start the administration service

    ·         Start the SharePoint Foundation Administration service
    Central Admin à System Settings à Manages Services on server
    ·         By using the Services Microsoft Management Console (MMC) snap-in in Windows. Click Start, clickRun and type the following:


    services.msc

    Monday, October 14, 2013

    Enabling Filestream and RBS with SharePoint 2010

     Note: This Post is applicable only to SQL server 2008, 2008 R2 with SharePoint 2010 only.

    The user account that you use to perform the procedures that are described in this document must have the following memberships:
    1)       Administrators group on the Web servers and application servers.
    2)       SQL Server dbcreator and securityadmin fixed server roles on the computer that is running SQL Server 2008.
    Note: Logon to SQL and Webserver with user account of SharePoint not local admin.
      
    A)     Enable FILESTREAM on the database server
    1. On the Start menu, point to All Programs, point to Microsoft SQL Server 2008 R2, point to Configuration Tools, and then click SQL Server Configuration Manager.
    2. In the list of services, right-click SQL Server Services, and then click Open.
    3. In the SQL Server Configuration Manager snap-in, locate the instance of SQL Server on which you want to enable FILESTREAM.
    4. Right-click the instance and then click Properties.
    5. In the SQL Server Properties dialog box, click the FILESTREAM tab.
    6. Select the Enable FILESTREAM for Transact-SQL access check box.
    7. If you want to read and write FILESTREAM data from Windows, click Enable FILESTREAM for file I/O streaming access. Enter the name of the Windows share in the Windows Share Name box.
    8. If remote clients must access the FILESTREAM data that is stored on this share, select Allow remote clients to have streaming access to FILESTREAM data. 
    9. Click Apply. See below:

    10. In SQL Server Management Studio, click New Query to display the Query Editor.
    11. In Query Editor, enter the following Transact-SQL code:
               EXEC sp_configure filestream_access_level, 2
               RECONFIGURE
    12. Click Execute.


    B)      
    Provision a BLOB store for each content database
    1. Click Start, click All Programs, click Microsoft SQL Server 2008, and then click SQL Server Management Studio.
    2. Connect to the instance of SQL Server that hosts the content database.
    3. Expand Databases.
    4. Click the content database for which you want to create a BLOB store, and then click New Query.
    5. Paste the following SQL queries in Query pane, and then execute them in the sequence listed.
      use [WSS_Content]
      if not exists (select * from sys.symmetric_keys where name = N'##MS_DatabaseMasterKey##')create master key encryption by password = N'Admin Key Password !2#4'

      use [WSS_Content]
      if not exists (select groupname from sysfilegroups where groupname=N'RBSFilestreamProvider')alter database [WSS_Content] add filegroup RBSFilestreamProvider contains filestream

      use [WSS_Content]
      alter database [WSS_Content] add file (name = RBSFilestreamFile, filename = 'C:\Blobstore') to filegroup RBSFilestreamProvider
    Note: In All the three queries replace [WSS_Content] with the content database name, and replacec:\BlobStore with the volume\directory in which you want the BLOB store created. The provisioning process creates a folder in the location that you specify. Be aware that you can provision a BLOB store only one time. If you attempt to provision the same BLOB store multiple times, you will receive an error.

                 
                 Commands should be successfully completed.

    Verify:

    Blobstore folder would be created under the path given. There would be a folder and a file in it.


    C)      Install the RBS provider components on each server (SQL and Web Server)
    Note: First install RBS on SQL server then First Web server then additional Servers.
    To install RBS on SQL server and then First Web server follow the below steps.
    1. Browse to http://www.microsoft.com/download/en/details.aspx?id=16978 find rbs.msi download X64 Package.
      Note: Do not download the rbs_x64 link given in TechNet article 
      http://technet.microsoft.com/en-us/library/ee663474.aspx
    2. Run cmd prompt as Administrator and then click OK.
      Change the directory to the place where rbs.msi is downloaded on the machine.
    3. Copy and paste the following command into the Command Prompt window.

      msiexec /qn /lvx* rbs_install_log.txt /i RBS.msi TRUSTSERVERCERTIFICATE=true FILEGROUP=PRIMARY DBNAME="WSS_Content" DBINSTANCE="DBInstance Name" FILESTREAMFILEGROUP=RBSFilestreamProvider FILESTREAMSTORENAME=FilestreamProvider_1
      Note:Replace WSS_Content and DBInstance Name in the above command.

       rbs_install_log.txt is the installation log file generated in the same path where rbs.msi is located.

      Verify:1) The process of installation finishes in 1 min. See task manager, there would be two processes “msiexec.exe ” running with the SharePoint user account that you logged in. You can see these processes only if you enable show processes from all users.
                         
                 2)  Verify if the Tables were created for the database WSS_Content. If there were no folders then the installation is not success. Verify Log file.
                          
                3)  Verify the programs installed in control panel, SQL Server 2008 R2 Remote Blob Store is installed.
                             
                4)  The size of the log file rbs_install_log.txt should be more than 1 MB. If you have less size then there should be some problem in the installation. 
    Troubleshoot in file size is less:
    Open the log file scroll to the bottom you can see an entry that Installation Completed Successfully, but never trust that message. Find for errors and resolve the same.

    Mostly the parameters passed in the above command should be wrong- check for db instance name, server name and especially spelling mistakes.
    Note: Follow the same process and command for First Web server.
    D) To install RBS on all additional Web and application servers
    1. Browse to http://www.microsoft.com/download/en/details.aspx?id=16978 find rbs.msi download X64 Package.
      Note: Do not download the rbs_x64 link given in TechNet article 
      http://technet.microsoft.com/en-us/library/ee663474.aspx
    2. Run cmd prompt as Administrator and then click OK.
      Change the directory to the place where rbs.msi is downloaded on the machine.
    3. Copy and paste the following command into the Command Prompt window

      msiexec /qn /lvx* rbs_install_log.txt /i RBS.msi DBNAME="WSS_Content" DBINSTANCE="DBInstance Name" ADDLOCAL="Client,Docs,Maintainer,ServerScript,FilestreamClient,FilestreamServer"
    Note: Replace WSS_Content and DBInstance Name in the above command.

    rbs_install_log.txt is the installation log file generated in the same path where rbs.msi is located.
    Verify:
    The size of the log file rbs_install_log.txt should be less than 1 MB, vice versa for SQL and First Web Server.

    Open the log file scroll to the bottom you can see an entry that Installation Completed Successfully, but never trust that message. Find for errors and resolve the same.

    Mostly the parameters passed in the above command should be wrong- check for db instance name, server name and especially spelling mistakes .

    E)      Enable RBS for each Content Database from Web Server:
                 Open SharePoint PowerShell as Administrator and perform the steps below:

                $cdb = Get-SPContentDatabase –WebApplication 
                $rbss = $cdb.RemoteBlobStorageSettings
                $rbss.Installed()
                $rbss.Enable()
                $rbss.SetActiveProviderName($rbss.GetProviderNames()[0])

    Verify:

    1. Executing $rbss.Installed() should return true, if false this may be due to the reason that RBS is not installed properly or RBS is not installed on other Web servers.
    Verify RBS installation log on all the servers. If you think something is wrong uninstall RBS from control panel and re-install using step C or D.


    2. Type $rbss and verify that ActiveProviderName is not Null. See below


    F)
          
    Test the RBS Installation:
    1. Open the Web Application where blob store is enabled.
    2. Open a library or list where we can upload documents.
    3. Upload a document whose size limit is more than 60 KB.
    4. Browse to Blob Store Folder on the SQL server and verify the latest modified folder. The document should be present in it.


                  The other way of checking this is to run below query on SQL database.              Select * from AllDocstreams where RBSID IS NOT NULL
    Note: RBS_ID has some value indicates that the document is in Blob Store. If it is null then it indicates that the data was present in SQL database itself.


    Note:
    The Blob Threshold limit by default is 60 KB.  This explains that only documents whose size is more than 60 KB are being moved to Blob Store.
    This setting can be verified by running the below query on the content database and checking the value for the column “extended_configuration” for the record matching your Filestream provider name stored in the "blob_store_name" column.

     Use [WSS_Content]
     
    select * from mssqlrbs_resources.rbs_internal_blob_stores
    G)     Adjust Blob Threshold:
                We can change the Blob Threshold limit for a content database my executing below commands as Powershell Administrator on any Web Sever .

                 $cdb = Get-SPContentDatabase –WebApplication
                 $cdb.RemoteBlobStorageSettings.MinimumBlobStorageSize=1048576
                 $cdb.Update()
    Note: 1048576 = 1MB, files size more than 1 MB would be moved to blob store.
     H)     Move Content In and Out of RBS:
                1)      Move Content from SQL to RBS:
                          The content database might be in use for many days and you have enabled RBS later, you want to move the content to RBS Blob Store. To achieve this execute the below commands as administrator of powershell on any Web
                          Server

                          $cdb = Get-SPContentDatabase –WebApplication
                          $rbss = $cdb.RemoteBlobStorageSettings
                          $rbss.Migrate()
    Note :1.Please note that when you run this command the server begins copying data from the database to the file system. If you've got a lot of data in the database, it may take a while.

    2. The Blob Threshold apply here, all the docs whose threshold limit is more than the specified values are pushed to the Blob Store.
    Verify:Browse to Blob Store Folder on the SQL server and verify the latest modified folder, the documents should be present in it.
    Execute the query  select* from AllDocStreams where RBSID IS NULL it should return zero results. The data from “content” column is pushed to ”RBSID” column and the Content Column is made NULL.


               2)       Move Content from RBS to SQL:
                         We need to disable RBS and move the content back to SQL. To achieve this execute the below commands as administrator of powershell on any Web server.

                         $cdb = Get-SPContentDatabase –WebApplication
                         $rbss = $cdb.RemoteBlobStorageSettings
                         $rbss.SetActiveProviderName("")
                         $rbss.Migrate()
     
    Note:SetActiveProviderName("") disables RBS, $rbss.Migrate() migrates the content back to SQL as ActiveProviderName is Blank.

    The documents were copied to SQL but they were not deleted from Blob Store, so before performing this action plans that the SQL server has more free space.

    If you want to move the content to another provider execute below commands.
    $rbss.SetActiveProviderName("Name of the provider")
    $rbss.Migrate()

    Verify:
    Execute the query  select* from AllDocStreams where RBSID IS NOT NULL it should return zero results. The data from column “RBSID” is pushed to “content” column and the RBSID column is made NULL.  
                   

    To double check that this, delete any known file manually from Blob Store and try to access the same from UI.
     I)        Enable RBS on another content database:

    You may create a new content database to the same web application and you want to enable RBS on this  or you want enable RBS on another content database of a different web application. To achieve this follow the steps mentioned below:
    1. Open SQL server -> SQL Management Studio ->Databases -> Expand the content database for which you want to create a blob store -> Right Click-> New Query
    2. Execute below queries

      use [WSS_Content_NEW] if not exists (select * from sys.symmetric_keys where name = N'##MS_DatabaseMasterKey##') create master key encryption by password = N'Admin Key Password !2#4'

      use [WSS_Content_NEW] if not exists (select groupname from sysfilegroups where groupname=N'RBSFilestreamProvider') alter database [WSS_Content_NEW] add filegroup RBSFilestreamProvider contains filestream

      use [WSS_Content_NEW] alter database [WSS_Content_NEW] add file (name = RBSFilestreamFile, filename = 'c:\RBSStore') to filegroup RBSFilestreamProvider

      Note:

      For best performance, simplified troubleshooting, and as a general best practice, recommendation is to create the RBS data store on a volume that does not contain the operating system, paging files, database data, log files, or the tempdb file.
    3. Run CMD as Administrator and navigate to the path where rbs.msi is located and execute the below command.

      msiexec /qn /i rbs.msi REMOTEBLOBENABLE=1 FILESTREAMPROVIDERENABLE=1 DBNAME=”WSS_Content_NEW” FILESTREAMSTORENAME=FilestreamProvider_1 ADDLOCAL=EnableRBS,FilestreamRunScript DBINSTANCE=”DBInstanceName”

      Note: 
      Make sure that you use same FILESTREAMSTORENAME that you used initially to install RBS. Use this command to check the name of file stream provider “$rbss.GetProviderNames()”
    4. Login to the Webserver and run the below commands

      $cdb = Get-SPContentDatabase  “WSS_Content_NEW”
      $rbss = $cdb.RemoteBlobStorageSettings
      $rbss.Installed()   
      $rbss.Enable()
      $rbss.SetActiveProviderName($rbss.GetProviderNames()[0])
    Verify:
    1.     $rbss.Installed() should return true.
    2.     Type $rbss and verify that ActiveProviderName is not Null. See below”


    J)       Uninstall RBS on a Web Server:
    Note: Perform uninstall of RBS only if RBS fails during its installation.
               Uninstall is achieved in 3 ways.
    1. Remove RBS from Control Panel
      Control Panel -> Add or Remove Features -> SQL Server 2008 R2 Blob Cache
           
    2. Run CMD as Administrator and navigate to the path where rbs.msi is located and execute the below command

      msiexec /qn /lvx* rbs_install_log.txt /x RBS.msi DBNAME="WSS_Content" DBINSTANCE="DBInstanceName" ADDLOCAL="Client,Docs,Maintainer,ServerScript,FilestreamClient,FilestreamServer"
    3. Double click on RBS.msi and uninstall (not recommended) 
               
      
    K)      Completely remove RBS on a Content database and also from server:
    1. Backup 1st: Backup site collection with stsadm, backup SQL db, backup RBS blob storage.
    2. Migrate all content off RBS to SQL and disable RBS for content db:

      On Webserver execute the below commands.

      $cdb=Get-SPContentDatabase
      $rbss=$cdb.RemoteBlobStorageSettings
      $rbss.GetProviderNames()
      $rbss.SetActiveProviderName("")
      $rbss.Migrate()
      $rbss.Disable()
    Verify:
    Type $rbss and you should see that Activeprovidername is NULL and Enabled is false.


         3.   Change the default RBS garbage collection window to 0 on your content db:

                     Execute the below commands in SQL server on the query editor for the content database.
                                       exec mssqlrbs.rbs_sp_set_config_value 'garbage_collection_time_window','time 00:00:00'
                                        exec mssqlrbs.rbs_sp_set_config_value 'delete_scan_period','time 00:00:00'
        4.    Change the default RBS garbage collection window to 0 on your content db:

                On Sql server open CMD prompt as Administrator and navigate to the path “C:\Program Files\Microsoft SQL Remote Blob Storage 10.50\Maintainer”
                Execute the command “Microsoft.Data.SqlRemoteBlobs.Maintainer.exe -connectionstringname  RBSMaintainerConnection -operation GarbageCollection ConsistencyCheck ConsistencyCheckForStores -GarbageCollectionPhases rdo -     ConsistencyCheckMode r -TimeLimit 120”
    See below:


            5.        Uninstall RBS:
                               On the content db RUN:
                              exec mssqlrbs.rbs_sp_uninstall_rbs 0

    Verify the below:
                 Only few tables are left in the database, all other tables have been deleted.
                 
                       Execute Below commands on the content database:
                       ALTER TABLE [mssqlrbs_filestream_data_1].[rbs_filestream_configuration] DROP column [filestream_value]                  ALTER TABLE [mssqlrbs_filestream_data_1].[rbs_filestream_configuration] SET (FILESTREAM_ON = "NULL")
     Note: If you have mssqlrbs_filestream_data_2 run the below two commands as well.
                     ALTER TABLE [mssqlrbs_filestream_data_2].[rbs_filestream_configuration] DROP column [filestream_value]                 ALTER TABLE [mssqlrbs_filestream_data_2].[rbs_filestream_configuration] SET (FILESTREAM_ON = "NULL")
      Now you can remove the file and filegroup for filestream:
                     ALTER DATABASE WSS_Content Remove file RBSFilestreamFile;                ALTER DATABASE WSS_Content REMOVE FILEGROUP RBSFilestreamProvider;
    Verify: This will remove the Blob Folder from the file system however still few tables exist as shown in the previous screen shot

    Note: Perform all the above steps on other content databases if you want to remove RBS on them.

            6.    Perform the two steps below to completely remove RBS and file stream on SQL server.

                   Uninstall from add/remove SQL Remote Blob Storage from SQL and Webservers.

                   Disable filestream in SQL Configuration Manager for your instance (if you do not use it anywhere aside this single content db with sharepoint), run SQL reset and iis reset and test.
    More Information:
    1)       Site collection backup and restore and site import or export will download the file contents and upload them back to the server regardless of which RBS provider is being used. This process is known as a deep copy. However, the FILESTREAM provider is the only provider that is currently supported for SharePoint 2010 Products farm database backup and restores operations.
                     All the below scenarios works perfectly, no data loss at all.

                    Export  / Import from RBS content db to normal content db
                    Export  / Import from normal content db to RBS enabled content db
                    Export  /Import from RBS enabled content db to RBS enabled content db
                    Backup / Restore from RBS enabled content db to Normal content db
                    Backup / Restore from normal content db to RBS enabled content db
                    Backup / Restore from RBS enabled content db to RBS enabled content db
                    Backup / Restore from CA
                    Attach / Detach Content db – After attaching using powershell Run rbss.installed() on Webserver
    2)       Content stored in remote BLOB stores cannot be restored by using DPM
    3)       If you plan to store BLOB data in an RBS store that differs from your SharePoint Server 2010 content databases, you must run SQL Server 2008 with SP1 and Cumulative Update 2 or SP2
                Note: Make sure you use RBS.msi for SQL server 2008 R2. Do not use SQL server 2008 RBS file.